Saturday, December 26, 2015

Made It! Final Tag for Linda's Challenge!

I've been holding out on the plaid-inspired tag #4, as I wanted to do something like the background Autumn used on her ode to coffee.  I really love the colors of the Basic Grey paper she used.


So I procured an Echo Park Candy Cane Stripe 6 x 6 stencil....


and this morning at my brother's dining room table, I tried to emulate this look..... I used Festive Berries, Iced Spruce (that is the grey-colored striping), Cracked Pistachio, and Shabby Shutters.... my piece is very small (4 x 6), so I was not able to get a lot of striping in unlike her background..... but I do like the look.


 I had brought along some seam binding died in Candied Apple (which I got just before I left - really am going to love that color)... and tied a fluffy bow, and glued on a scrap flourish die cut that had been painted in Tarnished Brass Distress Paint. Then I colored a little Tim Holtz Holiday Flashcard with Peeled Paint, and after flicking some water on it, I tucked this under the bow, and placed a little bit of rhinestone bling.....   It doesn't show in this picture, but the piece is mounted on a piece of card that I edged with Black Soot Distress Ink - were I home, I would have used a black tag.

So that wraps up my tags for Linda's challenge this year - so glad I could play along!  And thanks to Linda for her Funkie Junkie Boutique support!  What great inspiration from everyone - so much to think about in the coming year, which I hope is a good one for everyone!  Thanks so much for stopping by, and please do let me know your thoughts - love to hear from you!  xxx Lynn

Friday, December 25, 2015

Funky Junkie Tag 11!


I was inspired by Linda's use of mixing a medium and her colors for her Tag #11 . 


I started with a large (#12) tag from Linda's wonderful Funkie Junkie Boutique , and applied heavy clear gloss gel through a flourish stencil, after first painting the tag white with Picket Fence Distress Paint, which took several coats. This is one of the tags I finished in the hotel room, and all of this painting and stenciling had been done at home some days prior, as I was scheming how I would get all twelve tags done in time.  I forgot to add in some Clear Rock Candy at the time of stenciling, alas.


Now, in the hotel room, I used several colors of Distress Ink (I had all of my mini pads with me, as I am bringing a second set with me to stay in my new vacation house... which is why I also happened to have a craft sheet with me, along with a good number of other standard crafting supplies!)
I smooshed my flourished tag around in these lovely inks..... and I really like what I got....


Then I took some Glossy Accents, and diluted it with a wee bit of water, and spread it on my tag with my finger here and there, immediately followed by Clear Rock Candy (one of the standard supplies I had in my suitcase)....


I colored a die cut label with some Chipped Sapphire Distress Ink... of course flicking it with water....
 and added a Tim Holtz rub-on greeting.

Next I glued down a die cut layered snowflake painted in gold.... for the life of me, I could not locate the corresponding embossing folder in my piles around the craft area..... so I lined up a delicate  wafer thin snowflake die and hoped for the best - it actually came out ok, although I really love the embossing from the folder....so icy looking!


For a final touch, I added a little bit of stretchy gold "ribbon" that had come around a set of napkin rings.  And here is the final result.


One more tag to go, but that will take a bit of making - we will see if I skid in under the deadline!  Thank you so much for stopping by - and if you've time, please do leave a comment.  I appreciate them all, and you!  xxx Lynn

Whew! Funky Junkie Tag #12!


For Tag# 12, of Linda's Challenge, sponsored by her wonderful Funkie Junkie Boutique, I was inspired by her use of Kraft as a background.... and I am shamelessly stealing the look from Diana's fabulous Christmas tags!  Mine is not nearly as lovely as hers, but it is definitely something I will be working on in the future as I love this look
I am working out of a temporary mini-studio I packed at the last minute, but I also have some basic supplies like a duplicate set of mini Distress Inks, small bottle each of matte medium and Glossy Accents, a small glue gun, and a craft sheet, as I am ferrying these items to my new vacation home.  The house is not quite ready, but I have a storage locker in town, as I have already sent my entire quilting studio out.


I did some prep work at home a few nights ago....by putting on some texture paste through the Tim Holtz flourish stencil.  This was then splattered with Picket Fence Distress Paint, using the splatter brush....


I had also brought some die cuts from white cardstock using the Festive Greens and Tattered Flowers, both tiny and regular size..

So I made up a couple of medium roses, and three little ones....
and arranged with pieces of a Memory Box wreath.


And here it is, with some detail shots......just one more tag (the plaid one!)


Thank you so much for visiting, and if you've time, I'd love to hear from you!  Happy Holidays!  xxx Lynn

Next up - Linda Tag #10!


As I was dithering about whether I could finish the tags for Linda's challenge, I realized that I would have a long evening ahead of me in a hotel before flying out bright and early on Christmas morning to visit my family across the country..... and as I had a lot of the components already made for several tags, I decided to pack a little mini-studio and take it with me..... and a very lovely evening I had!  Here is my take on Tag#10, one of three I completed in the hotel.  I never work this fast - maybe I am on to something, lol!
I started with the tattered florals die cut in cream cardstock, wet them thoroughly and scrunched them up. Once dry, I carefully opened them up - this is a technique from the very talented Jenny Atkinson.  

I fiddled with them until I got a flower that I liked, hot gluing as I went.... and then added a lot of Heidi Swapp gold spray - I love the denser coverage this spray yields.

The lighting in the hotel room was not too great for photos, but below you can see some of my components - a Memory box wreath sprayed with Distress Spray in Pewter and torn apart, a label cut from plain card, a flourish cut from the gold Deco Sheet (Tim Holtz), a piece of embossed acetate which I had painted per this guy - I used the Pewter Distress Paint - I think acrylic would be better next time, as I had a hard time getting the paint to stay in the recessed areas.


I made an arrangement that I liked, sprayed the label with the gold, wetting it and finger painting, and placing my little rose.  I am sure the staff is going to wonder what the heck I was doing to use so much toilet tissue, as I forgot to bring my rag, and of course had not paper towels to hand, lol!  But I surely did not want to mop up using their lovely terry towels!


Then I added a Tim Holtz rub-on, as I also had not brought stamps or permanent ink with  me....


After gluing everything down with Glossy Accents, I ended up adding some little silver snowflakes - not too keen about them but oh well, they are attached now!

Here is a shot that shows some more of the texture.....you can just make out the acetate on the very bottom....

And here, once again, is the final "tag"..... Thanks for stopping by, and if you've time, please do leave a comment - I love hearing from you!

I hope everyone had a lovely holiday.... xxx Lynn


Thursday, December 24, 2015

Snowflakes! Linda Tag 7!


Well, I am literally in the final countdown to finish my twelve tags for Linda's  annual Twelve Tags of Christmas Challenge, sponsored by her wonderful Funkie Junkie Boutique!

To date, I have posted my takes for her tags #1, #2, #3, #5, #6, #8, and #9.  And here is my interpretation of her tag  #7!

I've certainly thought about them all, and have made a few bits here and there in preparation for the final run..... we will see if I get there!


For this tag, I started with a wonderful blend of Distress Paints....


And then I flicked some Pewter Distress Paint on with the Tim Holtz splatter brush....


And as usual, had an idea that might have been best done prior to this.... which was to stamp with a Wendy Vecchi script stamp with a blend of clear and white embossing powders.... it mostly turned out clear.

Here it is in the light....


and without direct light....


Then I added some snowflakes left over from this, a bow made of seam binding colored with the paint leftovers from the tag base, and a little Tim Holtz holiday flashcard distressed with Chipped Sapphire....


Here are some detail shots...


And here is the final  tag!


Thanks so much for stopping by, and please do leave a comment if you've time - I appreciate them all and love hearing from you!  xx Lynn


Tuesday, December 22, 2015

Guesting for Our Creative Corner!


I was so thrilled to get the news that I would be a Guest Designer at Our Creative Corner this month!    I've made a little "Gratitude" journal with its own wallet enclosure as my "guest design".

Be forewarned, this is a l-o-n-g post, so feel free to skip through, or to cozy up with your favorite beverage and read along!

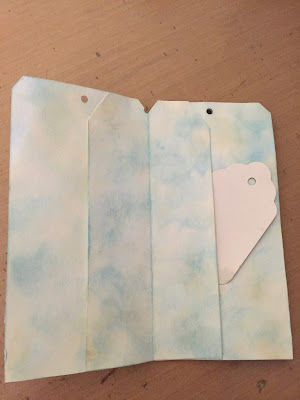
The journal itself is composed of tags, folded this way and that to create pockets and other areas for journaling.  There are many internet resources for making this sort of thing; I used  this video as my main inspiration.  The author of this (Kit) used wonderful two-sided scrapbooking paper to make her tags; in fact, she makes the entire little book from one 12 x 12 sheet of paper!  However, I knew I wanted to add a lot of images through stamping and die cuts, so decided to make my own paper and cut into larger tags.

I started, as usual lately, by wrinkle-free distressing some heavier cardstock with Antique Linen, Picket Fence, and a touch of Hickory Smoke Distress paints, covering both sides.


Once dry, I cut these into tags, using the Stephanie Ackerman large tag die (Sizzix 660280).  This cuts something very close to the larger #10 tag (just a tad shorter).

Then I sponged on some Tumbled glass Distress Ink..... the paint underlay makes this a bit splotchier than if I were doing this on a plain tag without the paint - but it gives an ethereal sky look, so I went with it.


I arranged the tags as I wanted.... following (more or less) the instructions from the video, and once I liked the arrangement, I glued them together to make the little journal. 


 I left some areas open for inserting tags or other ephemera.


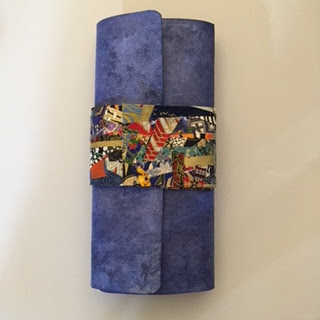
The wallet  is made of the new Ranger "Leather" paper, in white.  I folded it around my now glued-together book, scoring each fold and also scoring a 1/4 inch "spine" to allow for expansion as tags and ephemera were added.  The picture shows two pieces of leather paper, but I only used one for the wallet.  The second was too short to make the band, but I will use it in another project somewhere!
I used a large oval Spellbinders die (one of a set of concentric rings) to trace a large, even notch on one side of my wallet.  Here, I am using the printed edge of my Big Shot platform as a straight edge to align my die and paper before tracing and hand cutting.  I then dry embossed the entire wallet, using a large Tonic Studios embossing folder, for which I needed my Big Shot Plus.


To color the wallet, I sprayed with Stormy Skies and Blueprint Distress Sprays.... which appeared at first to obliterate the beautiful embossed pattern.  But to get some variation anyway, I sprayed, dried, and resprayed areas to get some varied color throughout, on both sides.


And to my delight, once I dried the very wet paper, the embossing showed up, ever so faintly!  The picture does not capture the fabulous indigo blue of the final color..... with beautiful variegation due to the heavy spraying.  The embossing and color were enhanced a bit more when I rubbed Distress Micro Glaze over the entire wallet - this will protect it and my fingers from all that wonderful Distress color from rubbing off in the future.


The wallet  closes with a belly band of collaged little bits of Japanese washi paper.  I was recently gifted with a marvelous stash of these papers from one of my students who traveled to Japan some years ago, and upon cleaning out her house decided they needed a new home - so happy they came my way!  I cut some strips from selected sheets, and then chopped them willy-nilly before adhering them to a couple of pieces of Stick-It that I had taped together.  I didn't worry about the minuscule areas of the underlayment showing through, as it all adds to the pattern.


Once all glued down, I cut out another band from a much larger piece of heavy cardstock, which would be the inside of the belly bandband.  (I work larger than many folks, so had procured some very large paper some time back - you could also hinge some regular sized cardstock together after collaging with some die cuts).  This inside band was sprayed heavily with Distress Antique Bronze, again to create a lot of pattern.  I then adhered the collage to this second band.  Once all glued together, I coated the entire bellyband with matte medium to secure the collage pieces and add some flexibility.  Then I applied a little magnet to each side, so the band would stay closed.  The second magnet is on the underside of the collage flap on the left.


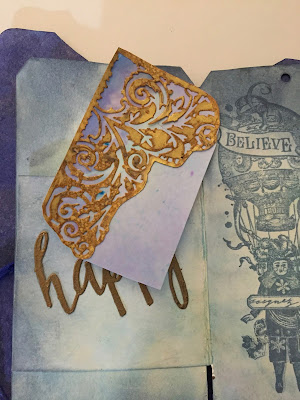
On to decorating the journal!  I cut a bunch of words from various dies from plain cardstock, which I then heat embossed with Vintage Gold embossing powder.


After futzing around with placement with where I wanted what, I then sponged the journal with Stormy Skies Distress ink, and stamped my images with Wendy Vecchi's Cornflower Blue.

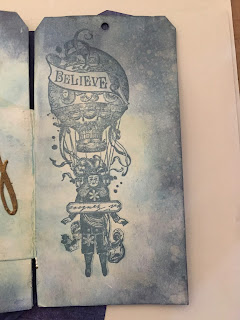
Then I glued down my embossed words.


and added some white and gold Frantage here and there in the midst of the journal....


and some eyelets on the front and back pages....


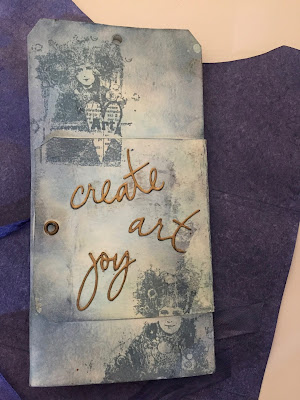
 I also added some die-cut tags, made from two-sided papers from Tim Holtz.


I also added a tag made from a Memory Box corner die on top of some mop-up tag I had from experimenting with Ken Oliver's Color Burst powder in blue.


Lastly, I tied some seam binding died in the same colors of the wallet to the two metal eyelets I had attached to the journal, to serve as a closure to the journal itself.


So there you have it, at last!! (And forgive the wonky placement here and there - Blogger and I are having words this evening, and Blogger is winning, lol!)


Thank you so much for stopping by, and if you've time, please do leave a comment!  I love reading them.... and it is always good to hear from you!

Wishing everyone the best of holiday seasons, however you may celebrate - xxx Lynn